Model building
DioramaOS: Using Lights, Sound, & Animation to Bring Your Stories to Life
Author's Note:
One of my goals with DioramaOS is to make this kind of storytelling accessible to other model builders.
You shouldn't need a background in software engineering or electronics to make a character speak, a light flicker, or a spacecraft come alive with movement.
As DioramaOS develops, I'll be sharing the Arduino code, wiring diagrams, component lists, and lessons learned along the way. Not just the finished results, but enough information for someone else to build, experiment, and adapt these ideas to their own projects.
Some of it will work beautifully the first time. Some of it won't. I'll share those experiences, too, because figuring out why something doesn't work is often where the most useful learning happens.
I'm not trying to create a system that dictates how anyone should build a diorama. I'm hoping to provide a collection of tools and techniques that makes it easier for people to tell the stories they want to tell.
Take what works. Change what doesn't. Make something your own.
And if DioramaOS helps you bring a story to life that might otherwise have remained an idea, I'll consider the experiment a success.
Two Droids Walk Into a Desert...
Well, technically, they're already in the desert.
R2-D2 and C-3PO. Two of the most recognizable characters in science fiction, and two characters whose personalities couldn't be more different.
Threepio worries. R2 improvises. Threepio complains. R2 has absolutely no patience for any of it.
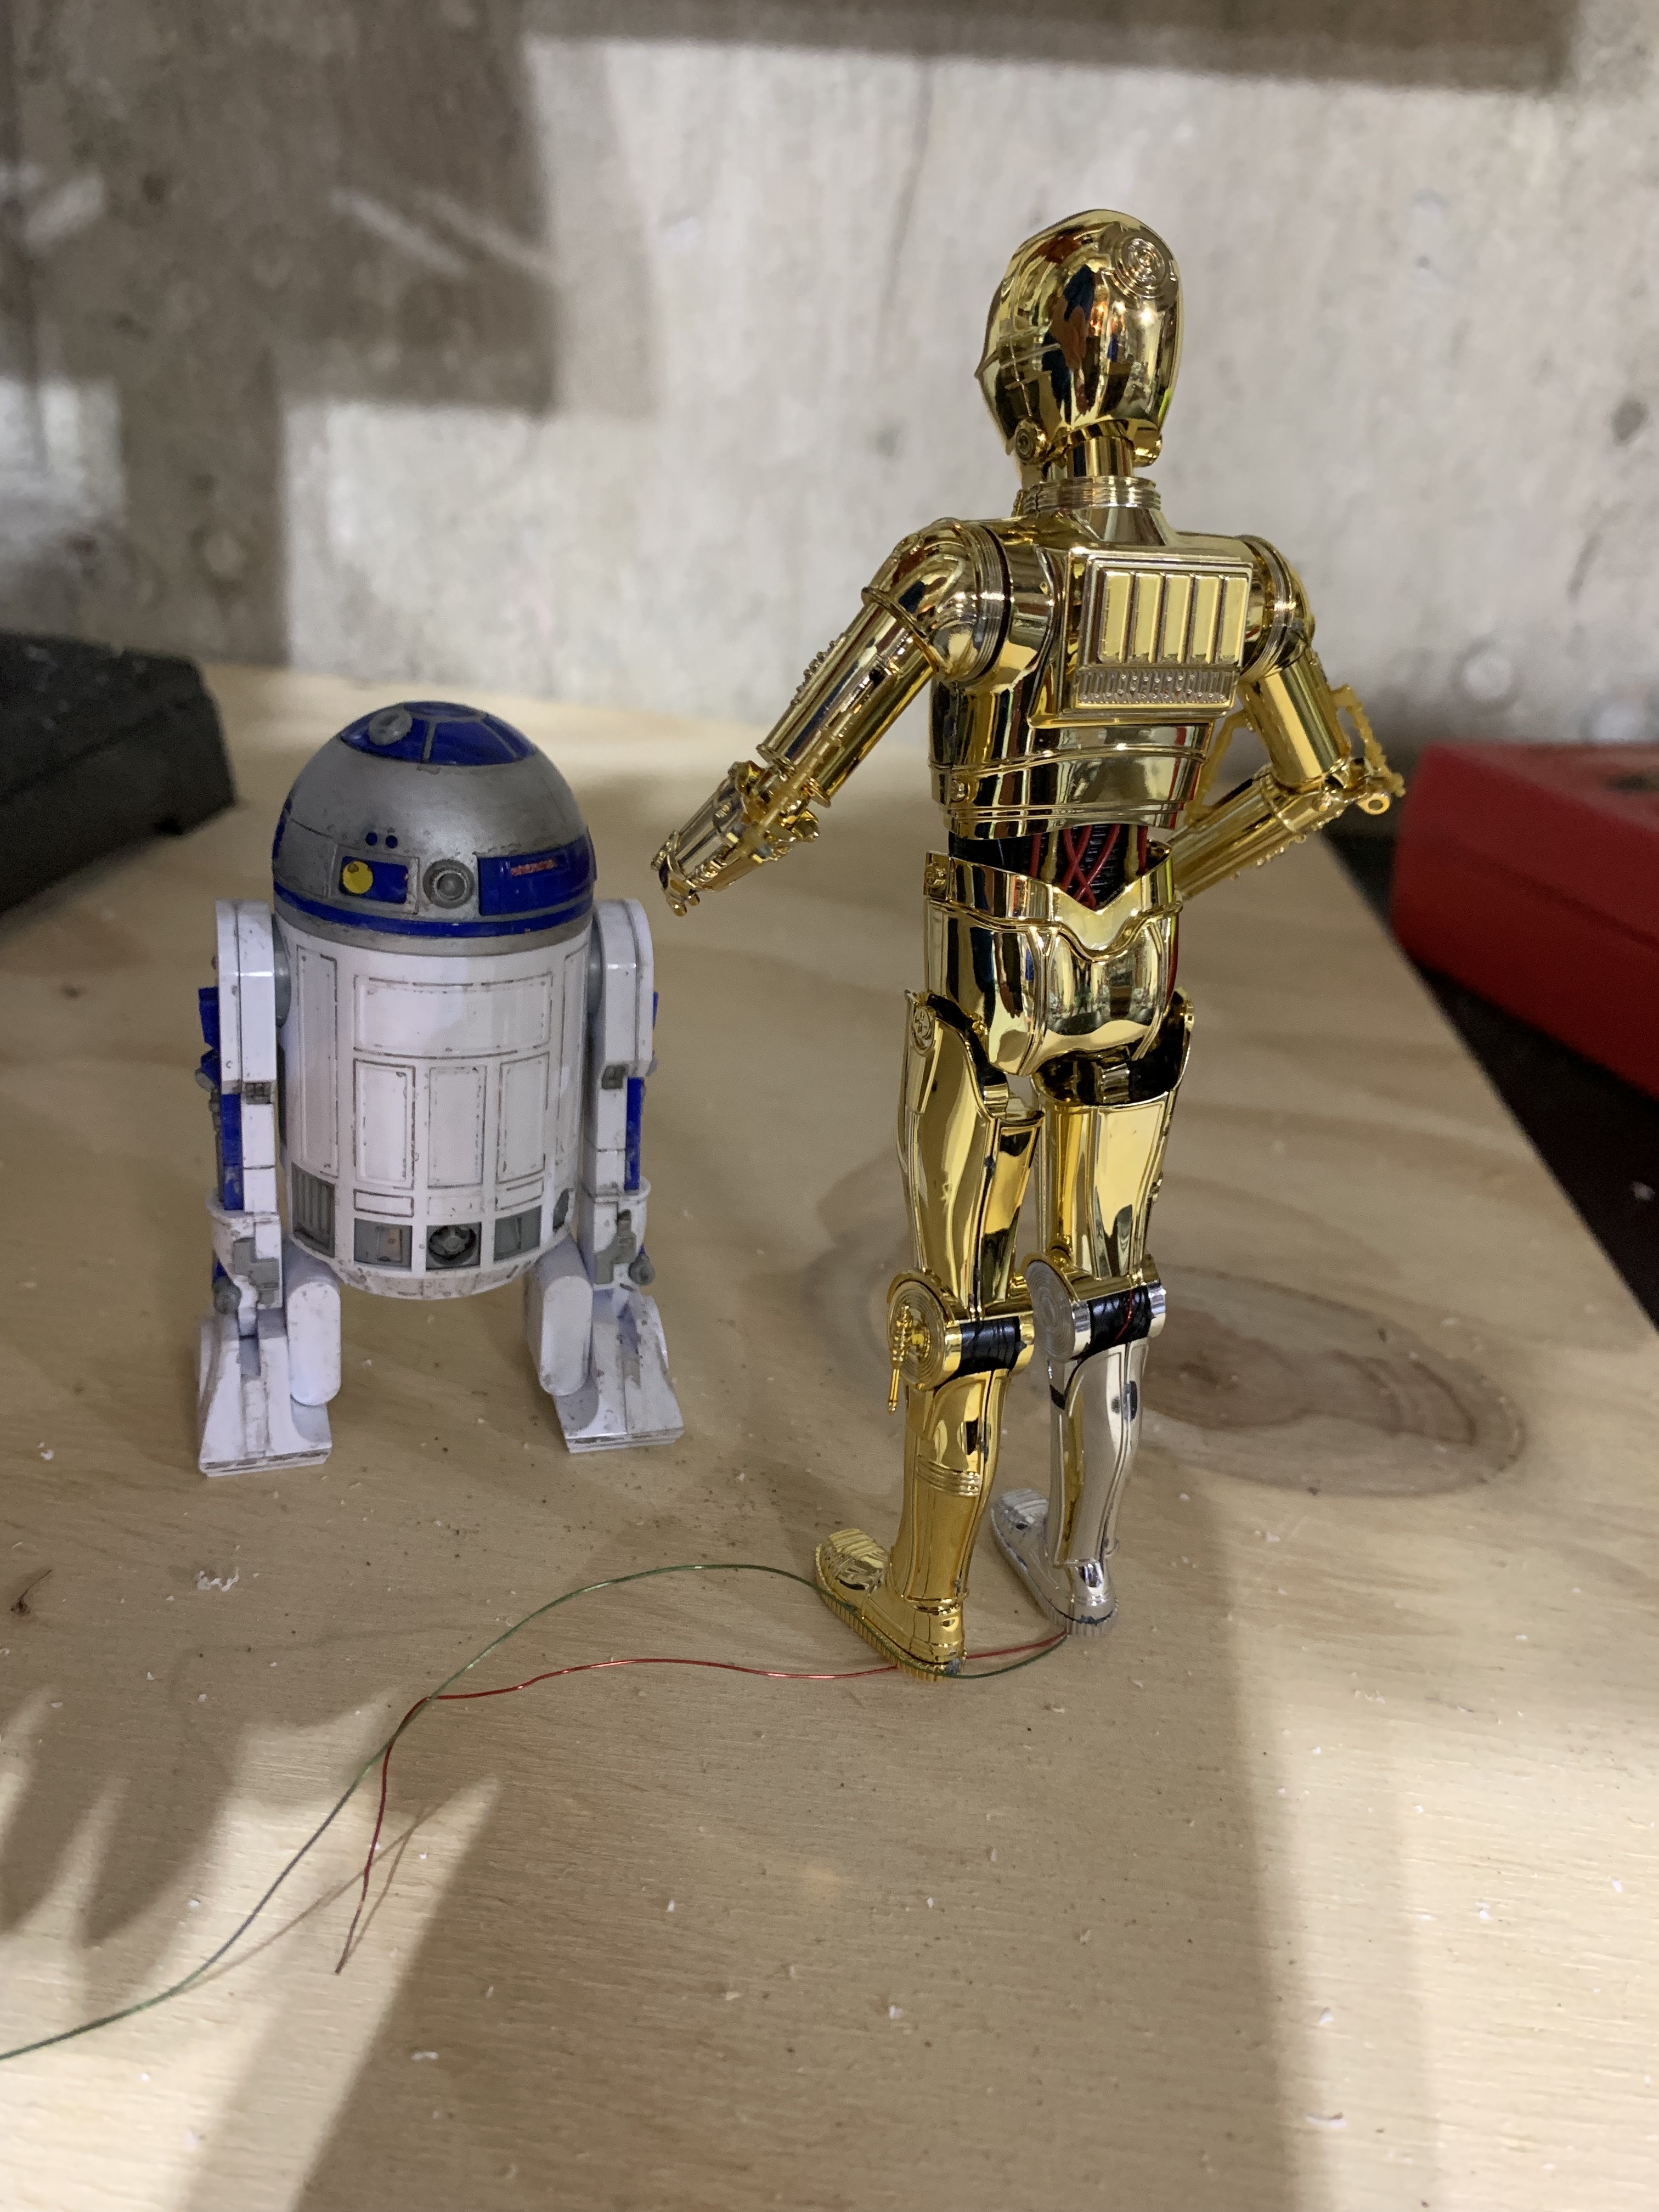
Now imagine a small diorama featuring the two of them.
We could build the models, paint them, weather them, and arrange them in a convincing desert setting. Add some rocks, sand, bones, perhaps a few bits of discarded machinery.
It would make a perfectly respectable diorama.
But what if Threepio started talking?
And what if R2, after a brief pause, turned his dome toward Threepio and responded with a particularly indignant series of beeps?
Suddenly, something changes.
We're no longer simply looking at two beautifully detailed models. We're watching a little scene unfold.
And that, in a nutshell, is what DioramaOS is about.
I've Been Doing This for a While
Adding electronics to my models isn't something new. Thanks to my Dad, I have been tinkering with a soldering gun since well before I learned how to drive.
Over the years, I've experimented with LEDs, sound modules, microcontrollers, and various ways of making things move. Sometimes the results were simple, like a few blinking lights. Other times, they involved a bit more choreography.
One of my earlier projects featured R2-D2 and BB-8 getting into a little trouble together. Their lights were animated, and they could exchange sounds using modules borrowed from a couple of toys.
I've also used lighting and electronics in other dioramas, including a Lost in Space Chariot and a Star Trek shuttlecraft. I have applied lighting to the old Monogram Space Taxi and have explored lots of ways to bring stories to life. I have plans for a couple of "magnum opus" dioramas in my project notebook. Battlestar Galactica (the newer series) has a few pages devoted to several concepts, and let's not forget more Lost in Space.
Each project taught me something.
And each project presented a familiar problem.
I was solving many of the same technical challenges over and over again.
How do I make a light blink at a particular interval? How do I play a sound without stopping everything else? How do I coordinate movement with audio? How do I make the behavior a little less predictable?
None of these questions is particularly difficult in isolation.
Solving electronics and software problems is part of the storytelling process, and I enjoy it. But solving the same problems over and over again? Not so much.
I wanted a way to preserve those solutions and share them with others, so we could spend less time reinventing the wheel and more time exploring new possibilities.
And, ultimately, telling stories.
So I started thinking about a different approach.
Enter DioramaOS
First, a confession.
DioramaOS isn't really an operating system.
At least, not in the traditional sense.
There's no desktop, no file manager, and certainly no reason to worry about installing updates while you're trying to finish painting a model.
It's a name I've given to an evolving collection of reusable software, electronics, and techniques for adding animation to dioramas.
The idea is relatively simple.
Instead of starting from scratch every time I want to add sound, lighting, or movement to a project, why not build a collection of tested components that can be adapted to different scenes?
A light that flickers like a damaged electrical panel.
A spacecraft engine that glows and pulses before takeoff.
A character that turns its head when another character speaks.
A sequence of sounds and movements that plays when someone presses a button.
The individual pieces aren't particularly revolutionary. Arduino enthusiasts have been doing things like this for years. Some wildly talented people have done this without the current proliferation of easily programmable boards.
What interests me is bringing those pieces together in ways that serve the stories we want to tell.
And making the process approachable for other model builders.
A Few Tools for the Workshop
One of the things I want to do with DioramaOS is introduce the tools I'm using along the way.
Some are familiar to anyone who has worked with electronics. Others may be completely new to model builders who have spent most of their time working with plastic, paint, glue, and the occasional colorful expression.
Here's what's finding its way onto my workbench.
This is where I write, compile, and upload the software that controls my electronics. This isn't to say you couldn't use a Raspberry Pi, ESP32, or something similar, but I'm standardizing this project around Arduino.
I'm currently using an Arduino Nano, a tiny microcontroller that's powerful enough to coordinate lights, sounds, and movement without taking up much space inside a model or the base of a diorama.
I'll be sharing the Arduino sketches as we go, along with explanations of what they do and how to modify them.
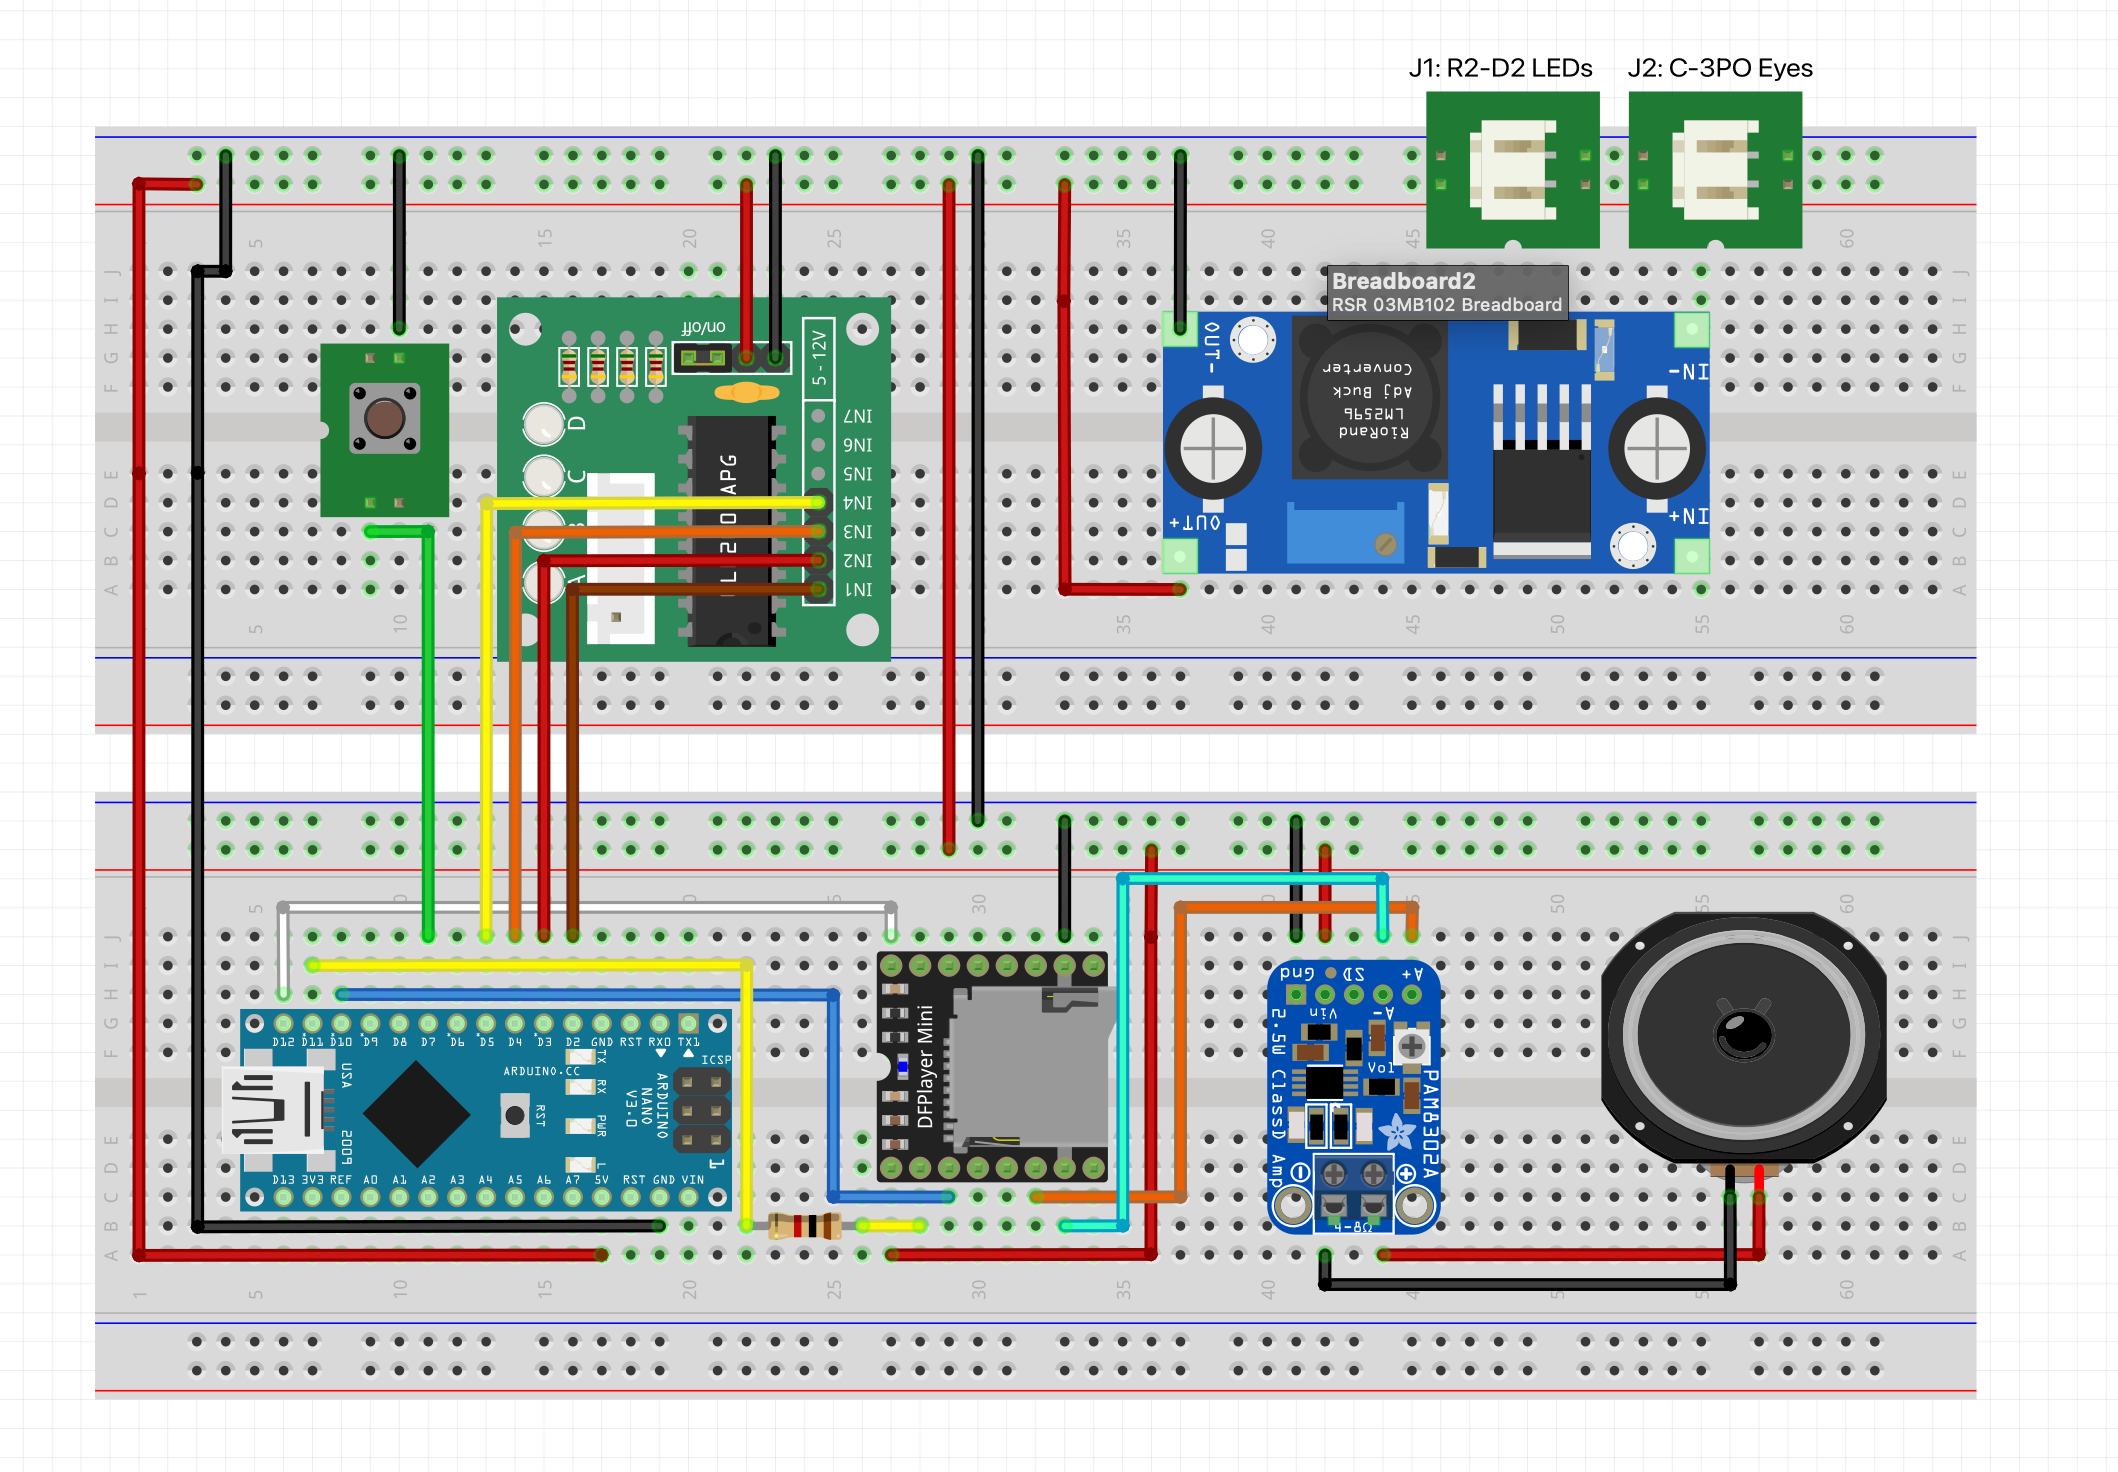
Fritzing helps me document the electronics.
It provides a visual representation of the components and their connections, but it also allows me to create proper circuit schematics, if you need or want them. It has an extensive library of parts and modules.
That's particularly useful when it's time to move from a temporary breadboard arrangement to something more permanent.
And when I publish a project, I'd like readers to have a wiring diagram they can actually follow.
Mokxi is a newer addition to the workshop, and one I'm particularly excited about.
I'd been looking for an online electronics simulator that could handle more than the simplest Arduino projects when I discovered Mokxi. It allows you to assemble virtual circuits, import Fritzing designs, and run Arduino sketches against simulated components.
What I hadn't expected was the opportunity to work directly with its developer, Dane.
I reached out to him about DioramaOS, explained what I was trying to accomplish, and shared my Arduino sketch and Fritzing work. What followed was a series of conversations, improvements to Mokxi's component support, and eventually a working simulation of our two argumentative droids.
Dane has been remarkably responsive to feedback, and it's been fun watching the tool evolve while I'm learning to use it. I might even RTFM some day!
It's not a substitute for testing real hardware, but it's becoming a valuable part of my workflow.
And frankly, its virtual breadboard looks pretty darned good.
Sometimes the biggest challenge isn't the electronics. It's figuring out how to fit everything into a model that was never designed to accommodate motors, wiring, and circuit boards.
Onshape is a browser-based CAD tool I use for designing parts and working through mechanical problems.
Combined with 3D printing, it opens up possibilities for custom brackets, mounts, enclosures, and other bits that might otherwise be difficult to fabricate.
As the collection of Arduino sketches and supporting files grows, GitHub will become the home for the code and documentation.
It provides a place to preserve working versions of code, track changes, and share projects with others.
More importantly, it means readers won't have to reconstruct an entire project from snippets scattered throughout a series of articles.
The goal is to make it easy to find what you need, understand how it works, and adapt it to your own builds.
AI Collaborators
Yep, we're going there. Not required, of course, but as a long-time software engineer, I have been using AI as a force multiplier for quite a while. It is especially useful when I need to debug code or identify something from the deep electronics catalogs. It can also be a useful tool for bouncing ideas off of, especially if you're the only one in the workshop and speaking to yourself isn't getting the traction you'd hoped.
Heh.
(you'll find many articles on AI on this website...I have thoughts about how AI should be used and how humans should not just be in the loop, but be responsible for their usage of the tools)
And, of Course, the Actual Workbench
None of these tools replaces the physical work.
There are still breadboards, soldering irons, multimeters, tiny wires, LEDs, motors, resistors, and a vast assortment of electronic components.
There are also hobby knives, pin vises, files, styrene, adhesives, UV resin, and all the other things that make scale modeling such an interesting combination of disciplines.
I'll be experimenting with more permanent circuit-building techniques as DioramaOS develops, too.
The important thing is that you don't need to acquire everything at once.
I'll introduce the tools as they're needed, explain why I'm using them, and explore alternatives when they make sense.
After all, the goal isn't to build an electronics laboratory.
It's to build a diorama that has something to say.
From Breadboards to Something More Permanent
One of the things I'm experimenting with is a hybrid solderable breadboard from Custom Circuit Solutions.
It combines the familiar layout of a breadboard with a circuit board designed for permanent soldered connections. That makes it possible to take a working prototype and transfer the components to something more durable without designing and manufacturing a custom PCB. Its power rail structure is unique, with the possibility of providing access for multiple power sources or bridging the rails together so that one power source can be made available to every device you mount.
The board also provides connection points for surface-mount components, and places for zero-ohm resistors that can serve as jumpers between sections.
For the current DioramaOS project, I've been laying out the Arduino Nano, DFPlayer Mini, and audio amplifier on one of these boards. The motor driver and voltage regulator will be mounted separately beneath the diorama.
After a fair amount of pencil-and-paper planning, I've managed to reduce the longer wire connections to just eight.
Of course, that still leaves approximately twenty-four zero-ohm resistors to install.
Twenty-four resistors whose job is to provide no resistance whatsoever.
There's probably a philosophical observation hiding in there somewhere.
I'll let you know how the soldering goes.
Back to the Desert
Our current experiment involves those two argumentative droids.
The scene is straightforward.
Someone presses a button.
Threepio says something.
R2 waits a fraction of a second, turns his dome, and responds.
When the exchange is finished, R2 returns his dome to its original position.
It sounds simple.
And from the viewer's perspective, it should be.
Behind the scenes, though, several things have to work together.
An Arduino Nano coordinates the sequence. A DFPlayer Mini handles the recorded dialogue. A small stepper motor rotates R2's dome, and a motor driver translates the Arduino's instructions into movement.
LEDs provide additional visual effects.
The Arduino doesn't simply execute a long series of delays and hope everything finishes at the right time. Instead, the software watches what's happening and responds accordingly.
For example, the DFPlayer has a signal that tells us whether it's playing audio. We can use that signal to determine when Threepio has finished speaking and when R2's response is complete.
We also introduce a little randomness.
R2 doesn't always wait exactly the same amount of time before reacting. His dome doesn't always turn to precisely the same angle.
Those small variations help make the exchange feel less mechanical. It looks a little more, well, human.
Which is a little ironic, considering that we're talking about robots.
The Computer Says It Works
And that's encouraging.
Recently, I ran my little droid conversation through Mokxi. The Arduino sketch was loaded, the virtual circuit was assembled, and I pressed the simulated button.
Threepio spoke.
R2 waited a randomized interval, turned his dome, and answered. When the exchange finished, the software instructed his dome to return to its original position.
The sequence worked.
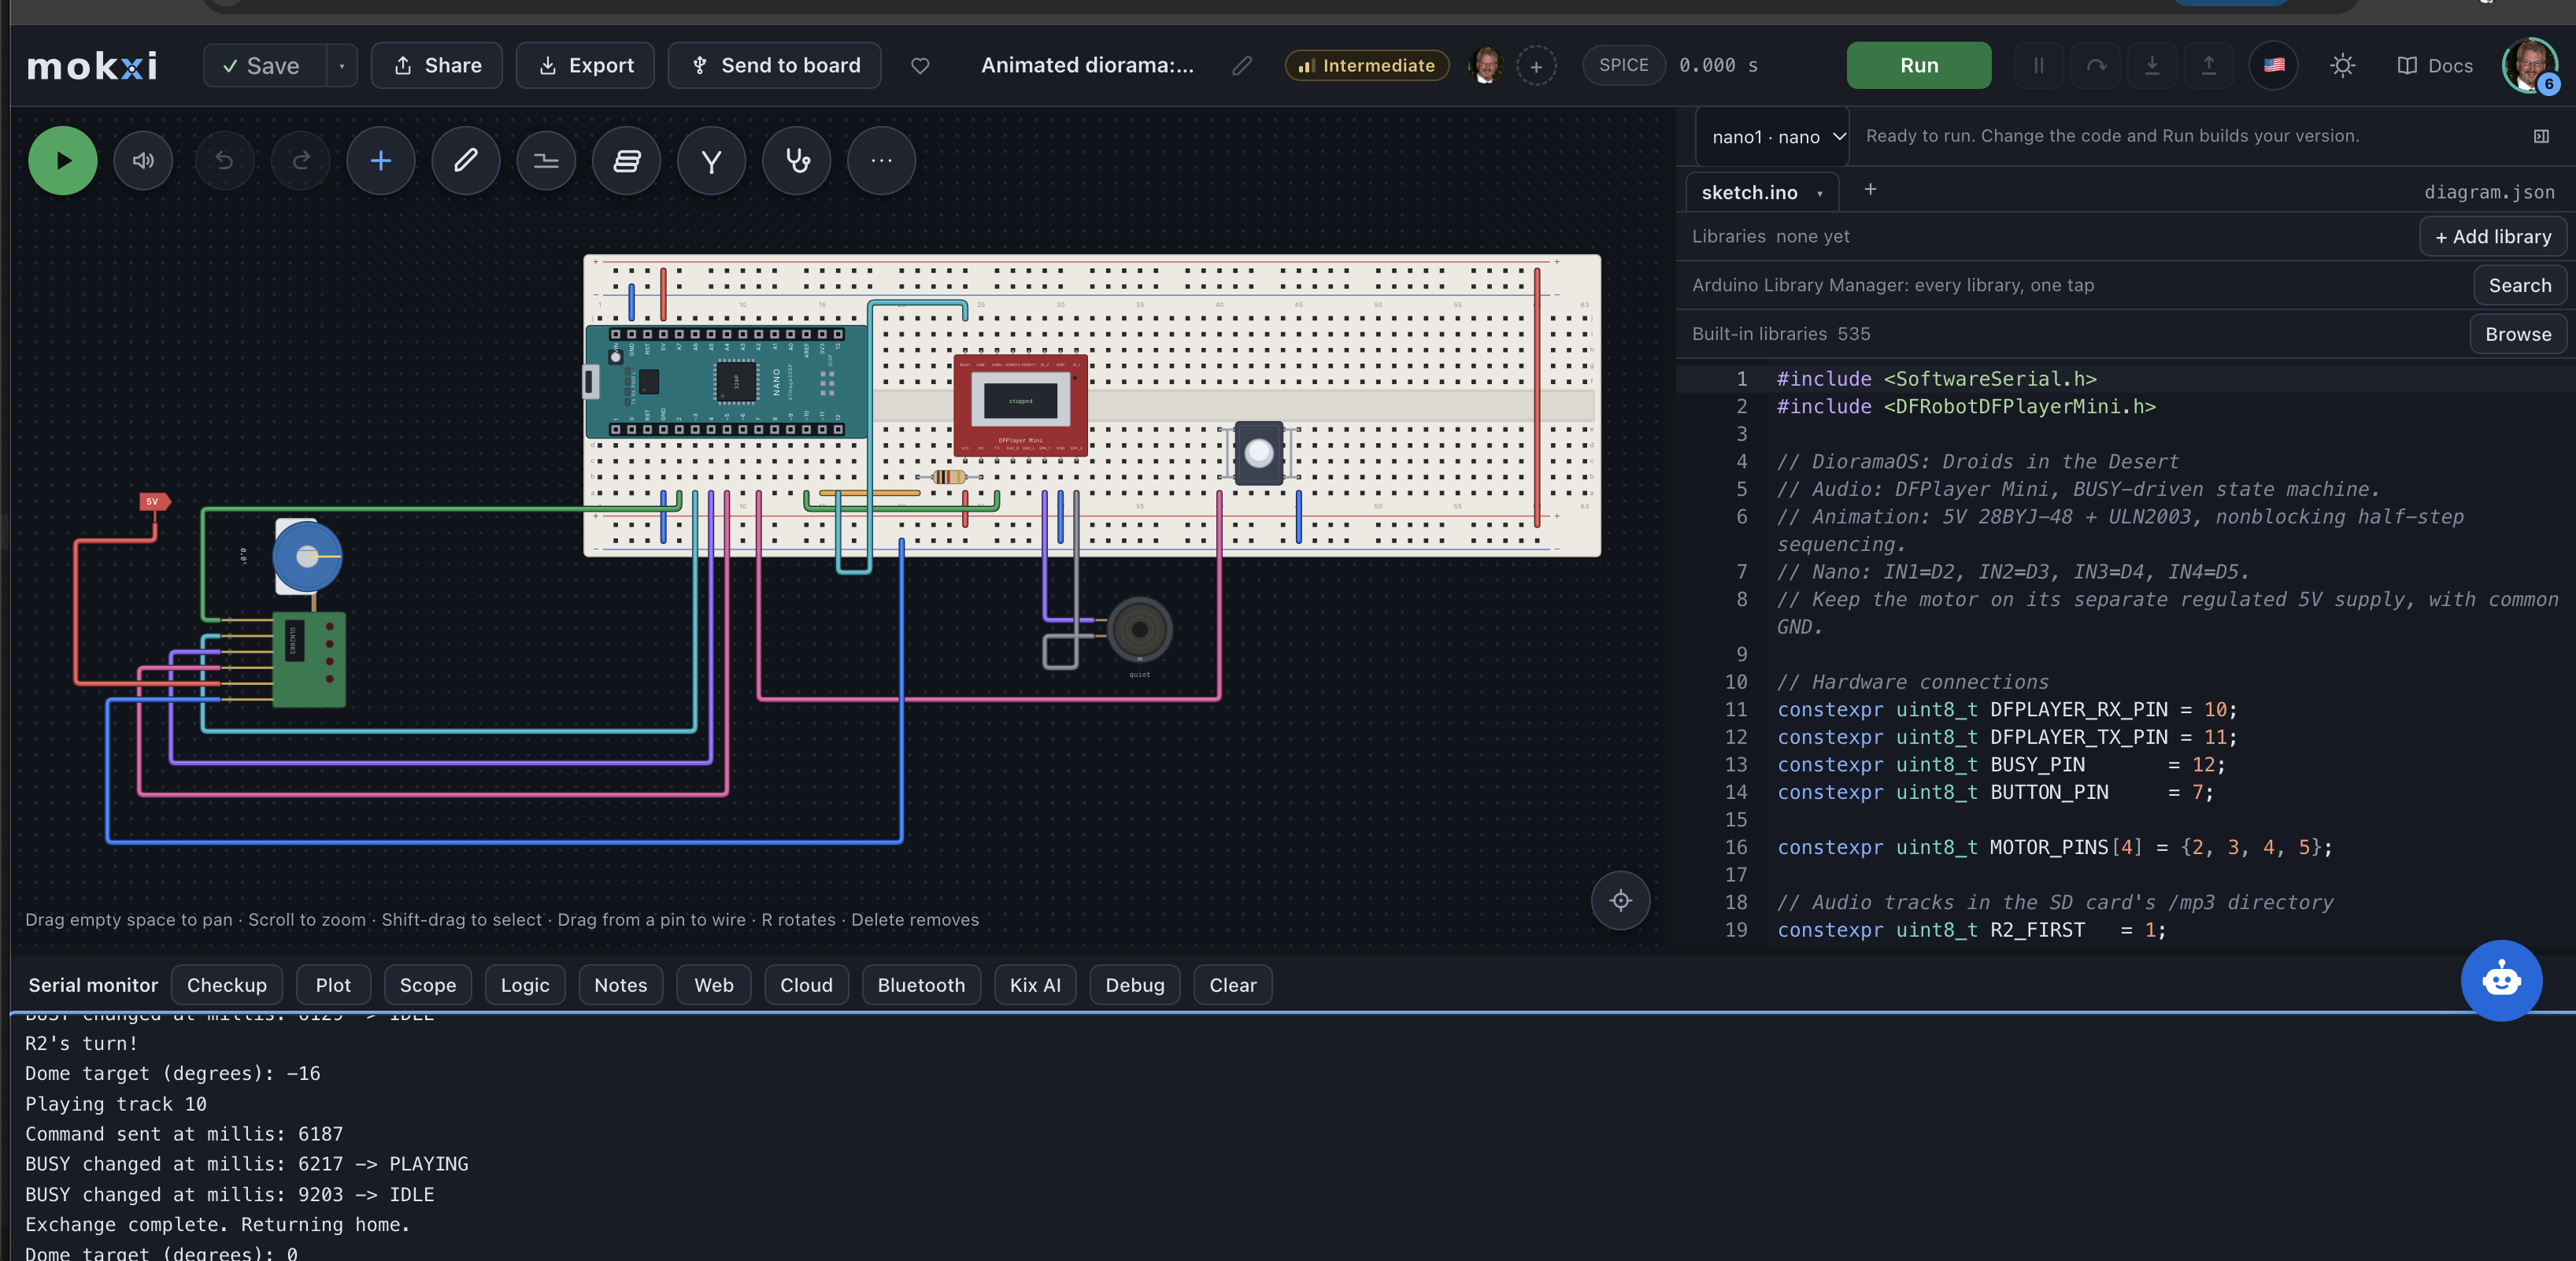
It was a satisfying moment, particularly because getting there involved more than simply uploading a sketch.
When I first contacted Dane, Mokxi's developer, I wasn't expecting much beyond a little technical guidance. I had an Arduino Nano, a sound module, a stepper motor, and a couple of Star Wars characters with longstanding communication problems. I knew how to make them all work together.
He had a simulator he was actively developing.
As we exchanged messages, Dane improved Mokxi's Fritzing importer to recognize additional electronic components, and we worked through getting the project running in the simulator.
What started as a question about whether a tool could support my project became a small collaboration.
And that reminded me of something I've believed for a long time about engineering.
Some of the best learning happens when people share what they're building, ask questions, and help each other solve problems.
I was learning how to use Mokxi. Dane was getting feedback from someone trying to build something real with it.
We both got something useful out of the experience.
That's very much the spirit I hope to bring to DioramaOS.
Of course, there's an important distinction between a successful simulation and a working physical model.
Mokxi doesn't know whether the motor shaft is properly aligned with R2's dome, whether a wire is rubbing against a piece of plastic, or whether the motor has enough torque to overcome friction.
And without the actual sound files, simulated playback doesn't necessarily match the timing of the real dialogue.
So I now have three complementary ways to evaluate the electronics.
Fritzing helps me document the circuit. Mokxi lets me experiment with its behavior. And the physical breadboard tells me whether the whole thing actually works.
That last one still gets the final vote.
The Real World Has Opinions
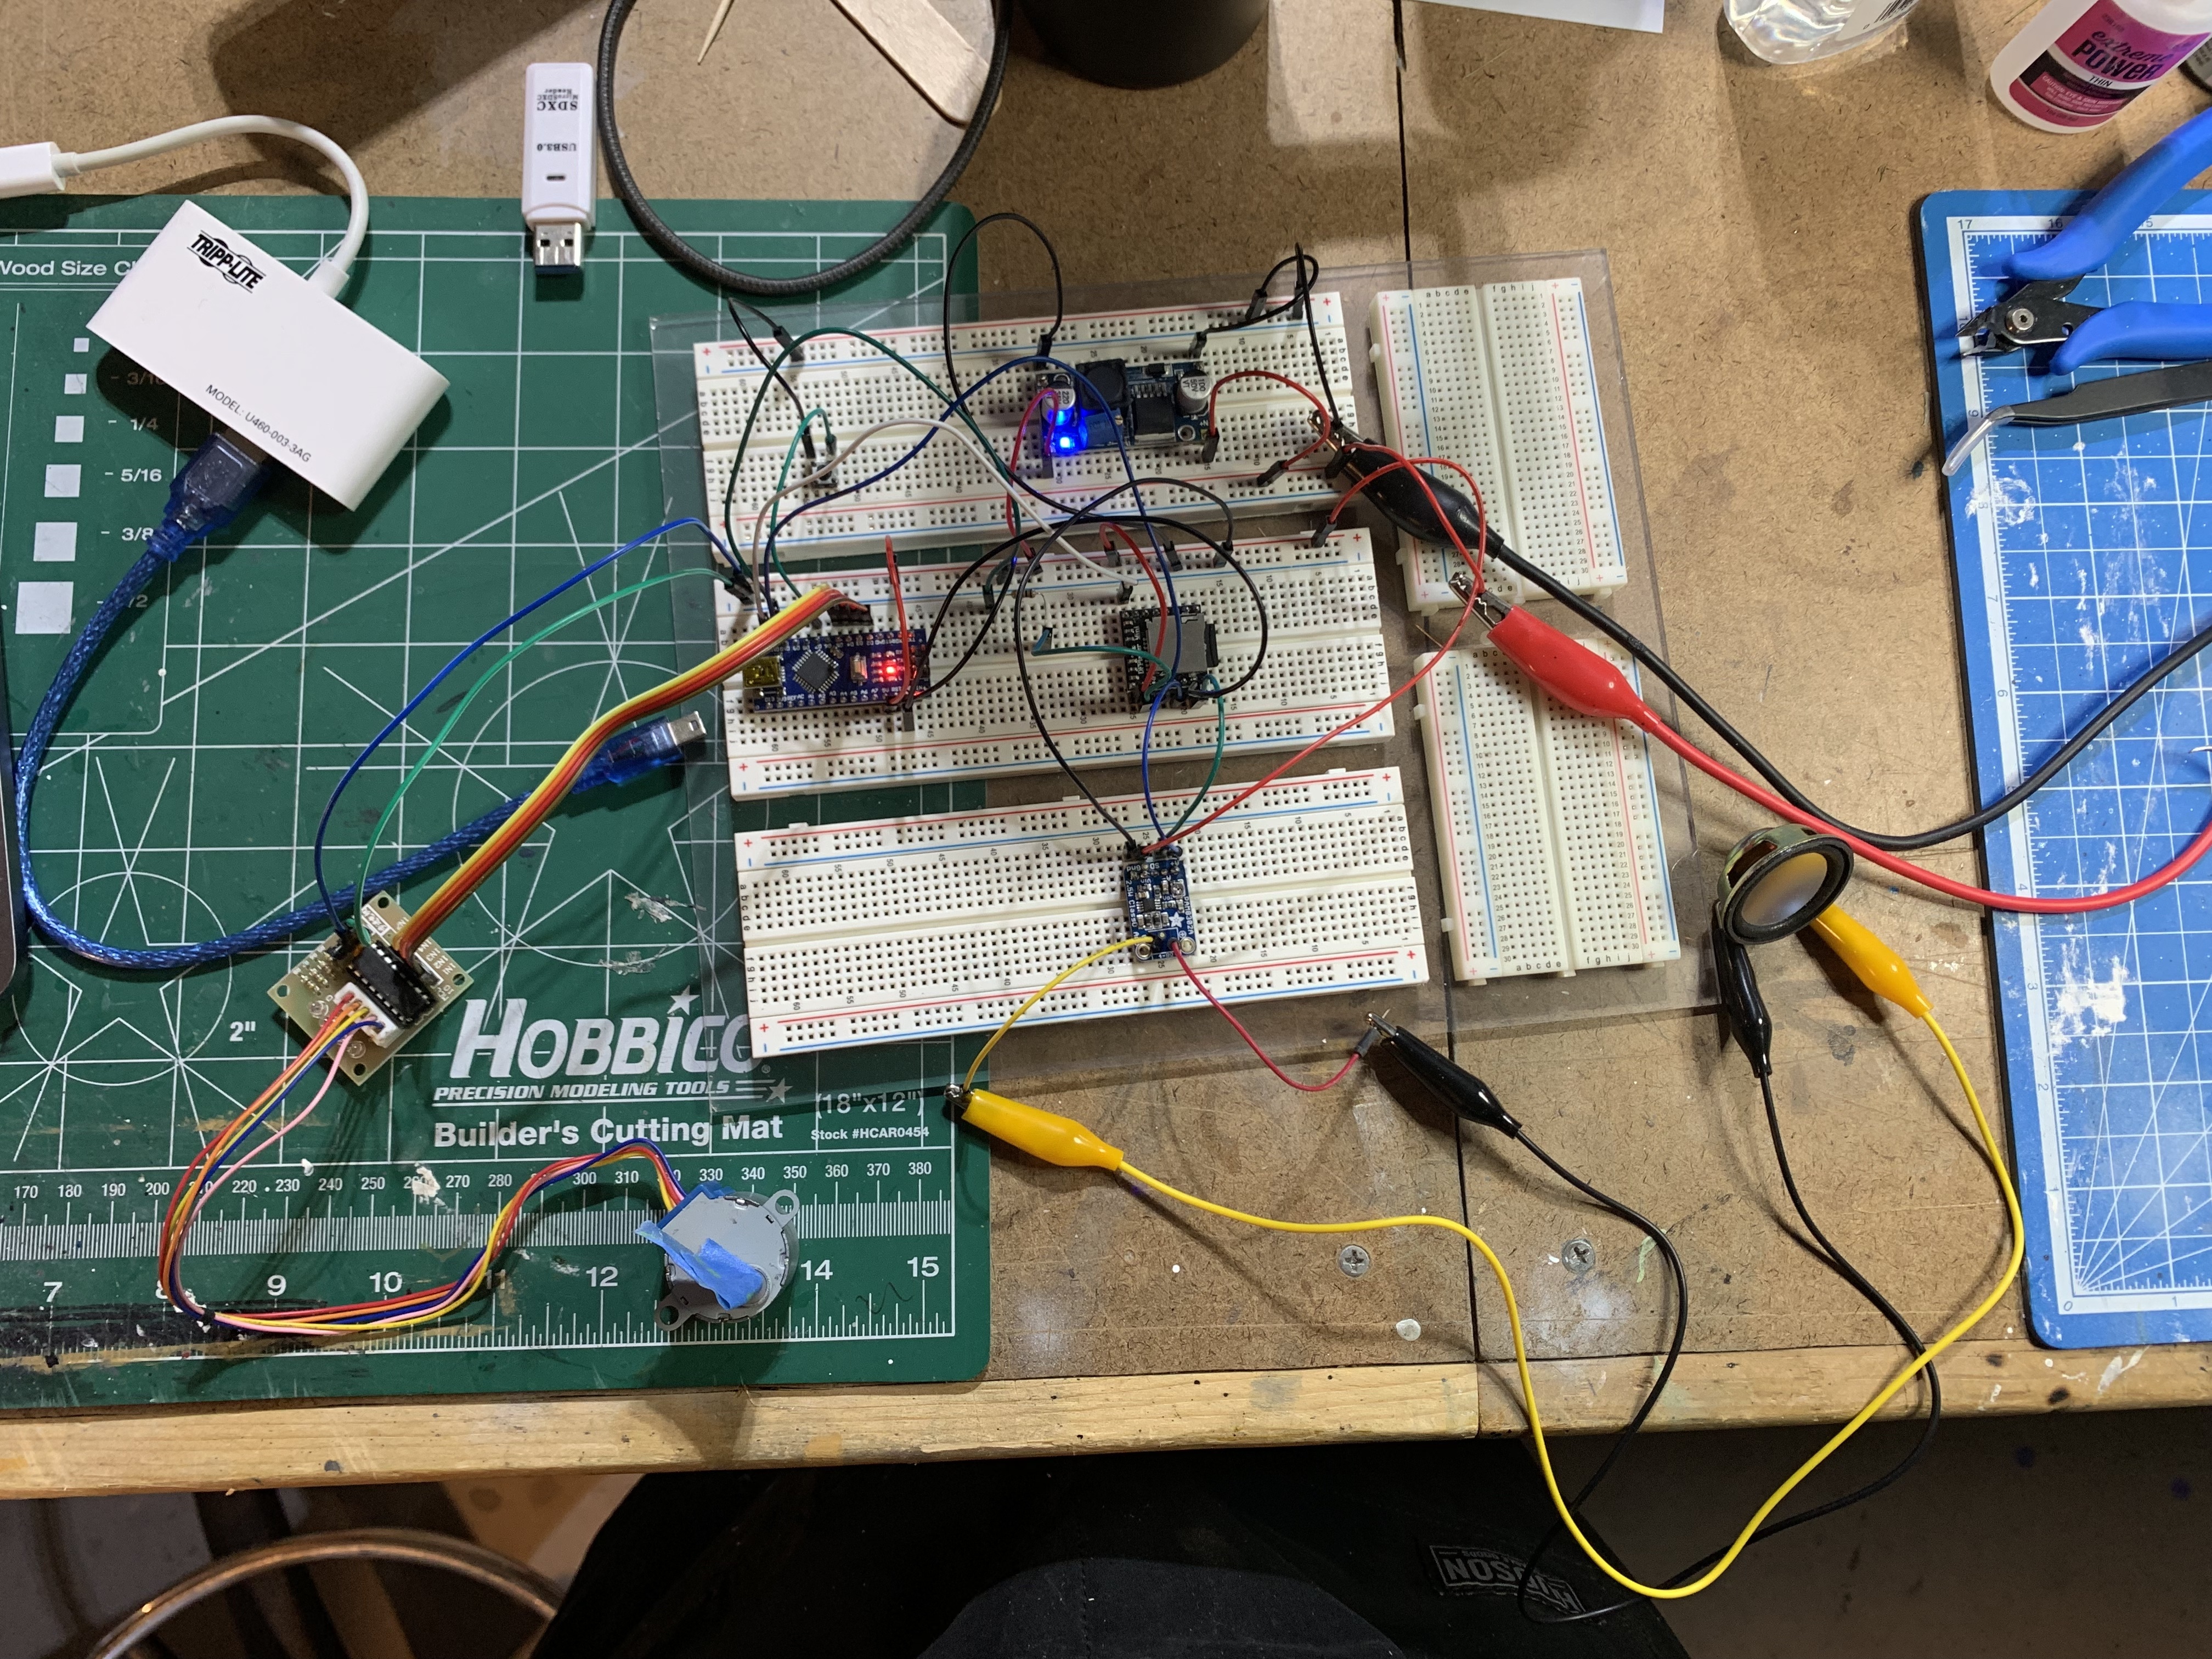
If you've ever tried to fit electronics into a scale model, you already know that the available space rarely cooperates.
Our R2-D2 is small.
Very small.
There isn't room inside his dome for a collection of connectors, circuit boards, and elaborate mechanical assemblies.
And rotating the dome introduces another challenge: the motor shaft has to drive the dome without interfering with the way the model's parts fit together.
I've spent a fair amount of time working through that problem.
There have been measurements, adjustments, a little sanding, and more than a few moments of staring at tiny pieces of plastic and metal.
At one point, I discovered that the motor shaft wasn't quite aligned with the center of the dome.
The difference was small, roughly a sixteenth of an inch, but small differences matter when you're working at this scale.
Fortunately, a little adjustment to the shaft's guide tube appears to have given us the alignment I need.
I'm still testing.
Meanwhile, the dome's LEDs have been embedded in UV resin, and the next step is routing their fine wires through the body and down into R2's foot.
It's the sort of work that rarely appears in a finished photograph.
But it's also part of the story of making the model.
And I intend to share those details, including the things that don't work.
Especially the things that don't work.
What Comes Next?
For now, DioramaOS is an experiment.
I have working Arduino code, a functioning breadboard prototype, a simulated version of the electronics, and a growing collection of lessons about fitting everything into a very small model.
The next steps involve finishing the mechanical installation, routing the lighting wires, and moving the electronics toward a more permanent arrangement.
As those pieces come together, I'll begin publishing the code, wiring diagrams, component lists, and explanations.
My hope is to make each installment useful on its own.
Perhaps you only want to add a flickering light to a damaged spacecraft. (You don't even need an Arduino for that!)
Maybe you want to make a robot speak.
Or perhaps you've imagined a scene where a vehicle starts its engines, lights come on, and something begins to move. (Think about that scene in Star Trek: The Motion Picture where the Enterprise comes to life before leaving drydock. Goosebumps.)
You shouldn't have to reproduce my entire project to do any of those things.
I'd like DioramaOS to provide an easy starting point.
Use one piece. Combine several. Modify the code. Change the hardware. Make it work for the story you're telling.
And if you've never worked with an Arduino before, that's fine, too. I'll start with the basics and build from there.
I won't pretend that everything will be simple.
There will be soldering. There will be debugging. There may even be an occasional electronic component that gives up its tiny life in a poof of smoke in the name of experimentation.
But that's part of learning.
And I think the results can be worth the effort.
It's Still About the Story
There's something I want to be careful about as this project develops.
I don't want the technology to become the point. I have built several dioramas that tell a perfectly good story without any of this. No lights. No stepper motors. No sound.
A blinking LED isn't inherently interesting.
Neither is a motor turning a shaft.
Those things become interesting when they contribute something to the scene.
A flickering light might suggest a damaged spacecraft struggling to stay operational, or a dataport streaming billions of bits of information.
A slowly rotating turret might suggest that something dangerous is approaching.
And a little blue-and-white astromech turning his dome toward a particularly talkative protocol droid?
Well, that tells us quite a bit about their relationship without needing a single word of dialogue.
That's what interests me.
Not simply making things move, but making those movements mean something.
DioramaOS is my attempt to make that kind of storytelling a little easier, both for myself and for anyone else who wants to try it.
I have no idea how far this experiment will go.
But I have plenty of stories I'd like to tell.
And apparently, so does R2.
A note about Mokxi: After I shared my experience using the simulator, Dane invited me to provide a short testimonial for its website and extended my complimentary Pro access as a thank-you. There was no requirement to write about Mokxi, and the opinions expressed here are my own.